1. From Apple Pages to iPhoto and your own paper book
I have now for the second time used Apple Pages and iPhoto to make my own books. Apple calls what I order for an Apple print product. This note will share some of that experience with you. (My books are in Norwegian and may be seen here, soon also the new book).
The general problem is that when you get a book in paper (from any manufacturer, I assume - not just Apple), the machines have to cut the paper after printing. In this case the manufacturer needs individual sheets, since the book I ordered is glued. So the spine end needs to be cut. And the book needs to be cut after it has been bound (glued), so that the three other sides get ok. Of course I don't get what I see, there is not really any WYSIWYG book production. Then we amateurs enter, and assume that we should understand book production, after 600 years of professionalism.
iPhoto's book assembly tool is heavily based on theme templates, with large portions of neutral parts around the edges. My pictures are automatically placed, or I pick and place them into predefined windows by hand. This may be difficult, since iPhoto (unlike Pages), does not seem to have any scale to fit or scale to fill options. For me this was a problem with the rear cover (more later).
But in my case the major problems come with the 1 picture possibility, where the whole page is mine! I love the option, but I hate the guessing.
With a full picture page iPhoto basically has these options:
- Fit to frame (tick on or off: I did off) ("Tilpass bilde til rammestørrelse" in Norwegian)
- Moving picture around by hand (I did push to right on right pages and push to left on left pages)
I guess the reason for the few choices is the complexity of cutting, as just outlined. For the front cover I did not do fit to frame, since I want (as much as possible) the top and bottom not to be cut. iPhoto crops the sides this way. When the book arrived I saw that it was not 20 cm wide, but 19.5 cm. If I had ticked fit to frame, I still don't think that they would have cut the height and kept the width. The option, I believe is for iPhoto, not production cuts.
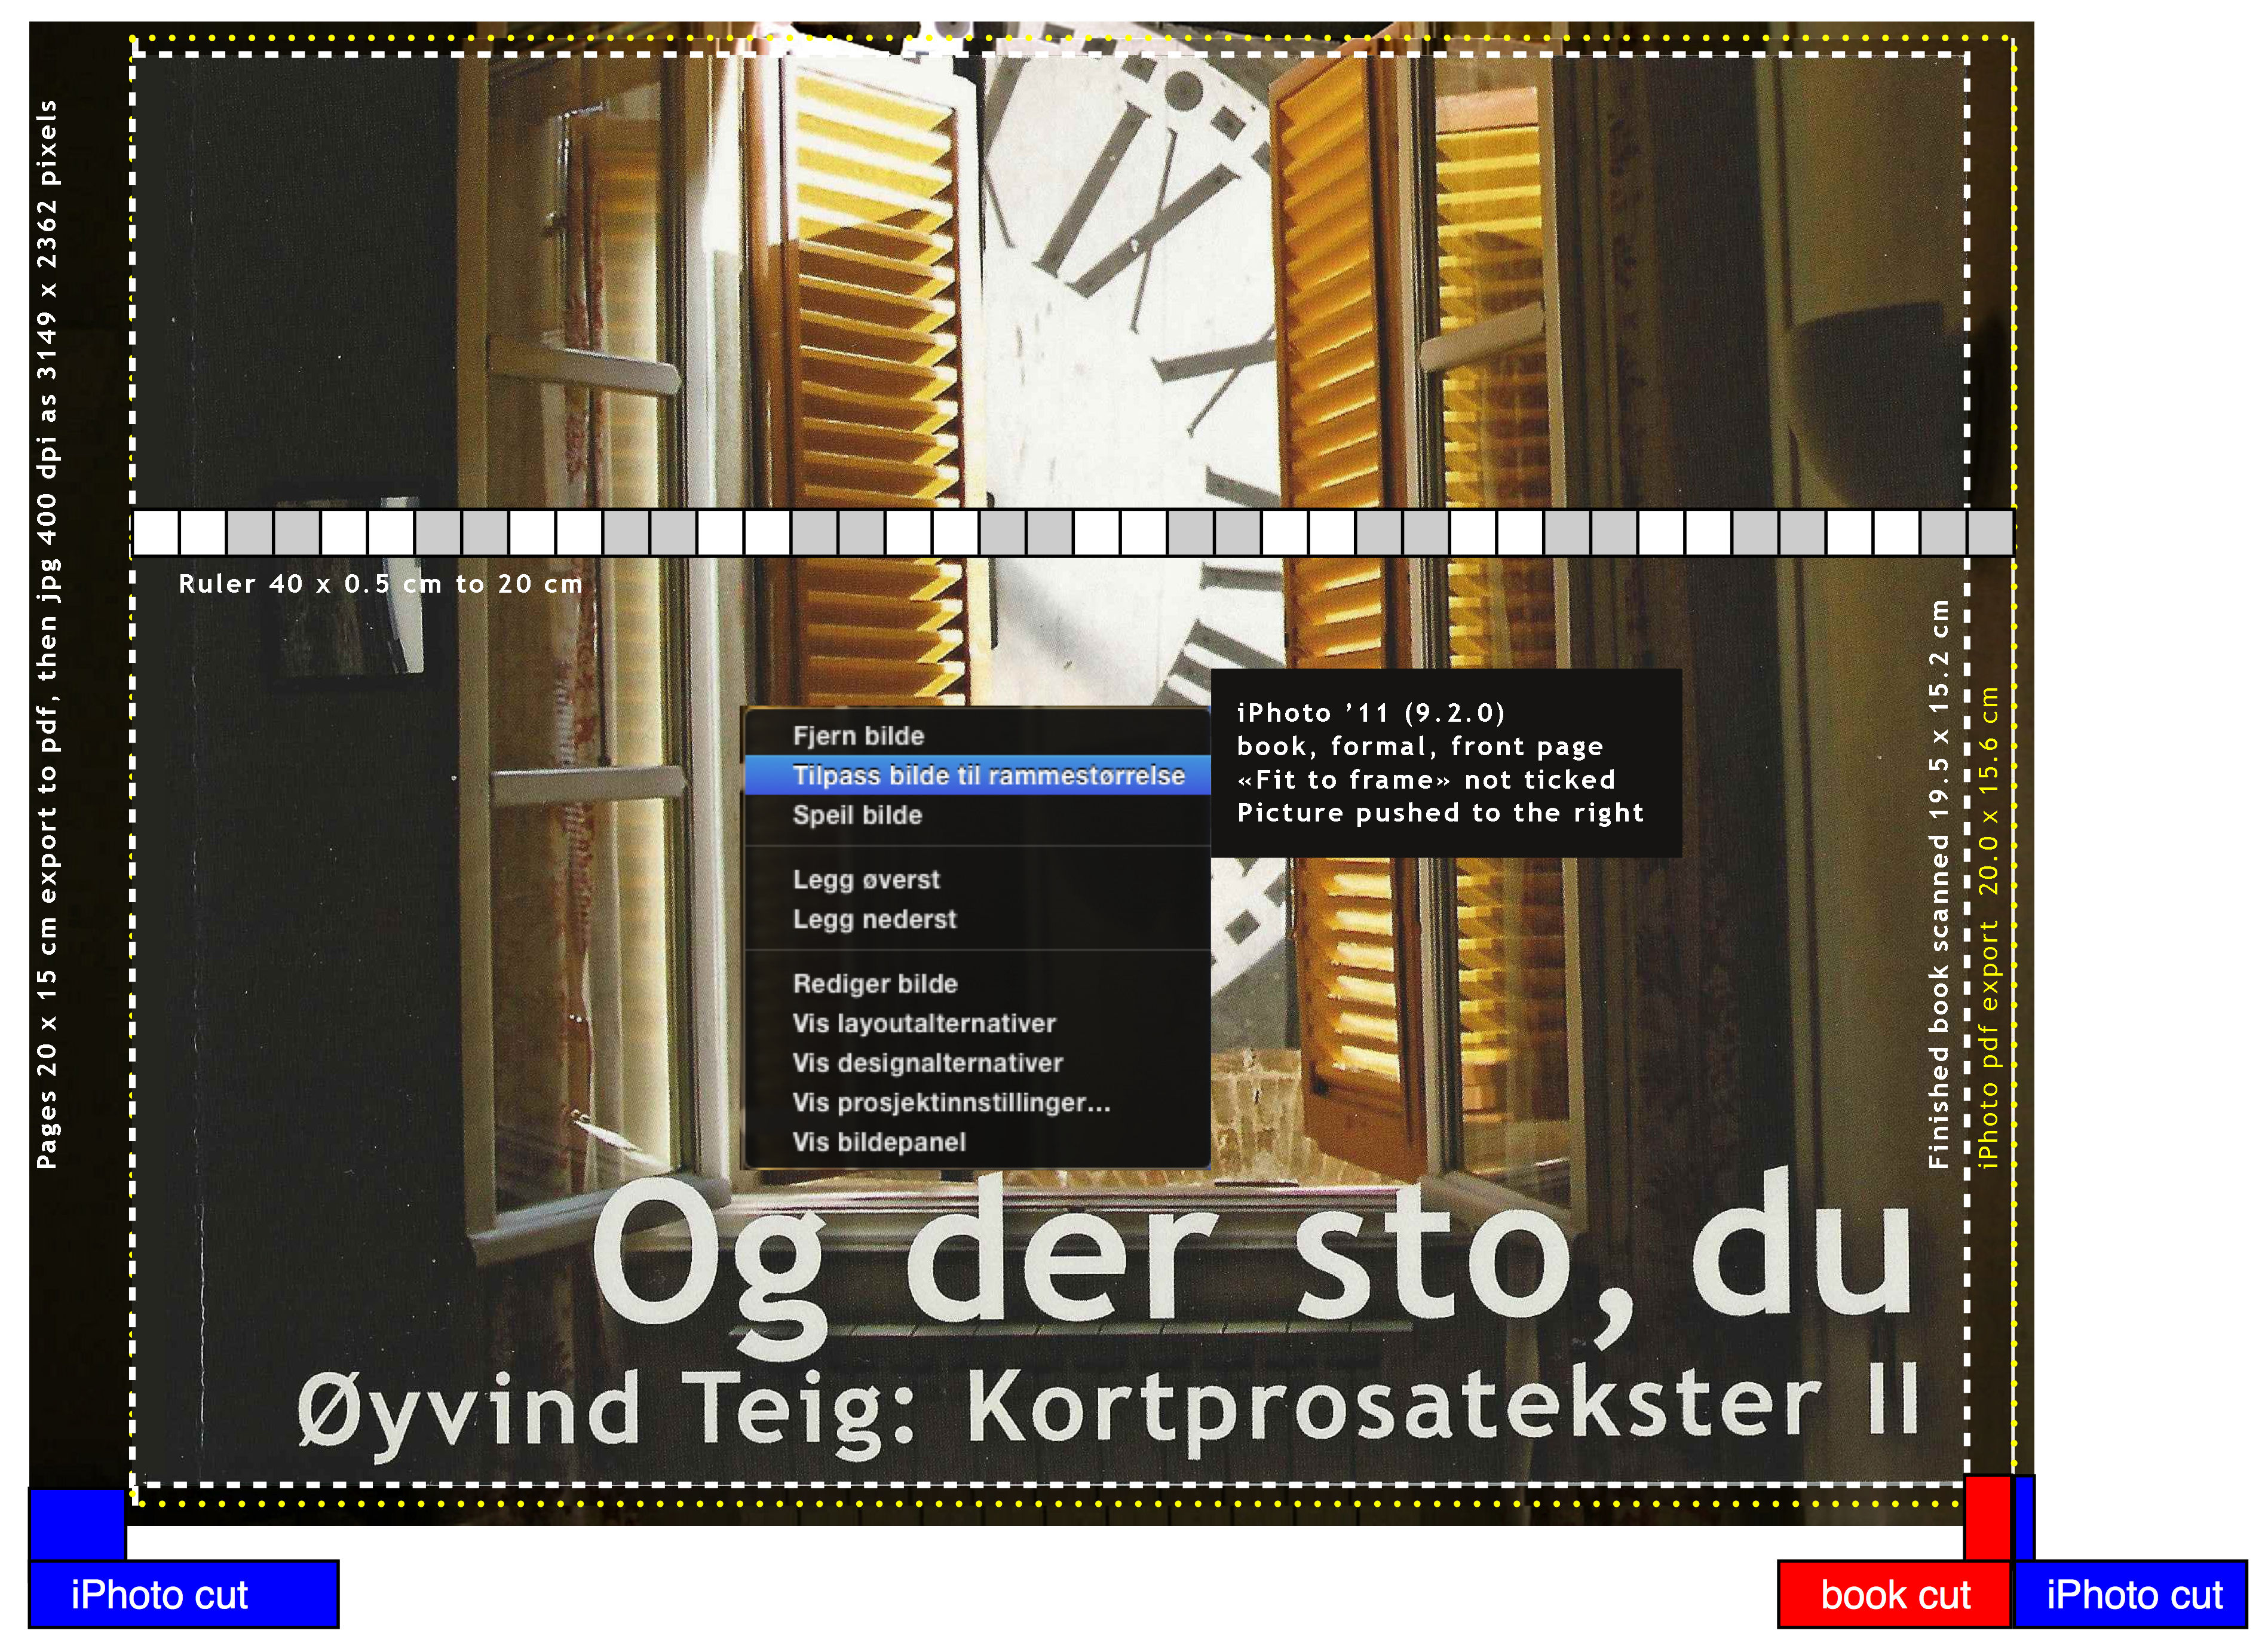
Here is my front cover. There is a higher resolution here. It shows iPhoto '11 9.2.0:
 I tried to figure out beforehand, but I could not find a figure like the above. Only complaints that there was none. There certainly are iPhoto forums and books, like iPhoto '11: The Missing Manual, there may be pictures like this there. Anyhow, the picture shows where my pixels go!
Observe the 0.5 cm graded ruler, starting at the book spine. The outer picture is the original (outer on all sides), aligned correctly on top of the book. It would have its own ruler, which is not show here, not to confuse.
 There are some problems. The first problem arises from the fact that Apple does some edge fading of the graphics. Probably nice for a picture, but not for an ISBN-13 barcode. The second problem is the limited handling: I can only scale up (not "smaller" from the original) with a slider, and push the picture left or right. In the picture you see that it's not aligned correctly in the middle yet. The third problem is the missing scale to fit or scale to fill. And the fourth is that I don't know how scaling & fitting is done initially. But I still assume that the tool designers at Apple have had their reasons for these design choices: probably to make standard handling as easy as possible.

My last book contains 24 short stories, so it has text and pictures. I start by getting ISBN numbers for free from the Norwegian National Library (Nasjonalbiblioteket, ISBN-kontoret). Since I make paper, pdf an ePub, I get three ISBN numbers.
This first chapter discusses the paper production.
First I must say that these books are expensive. But for the limited editions I seem to do, I haven't found any better deals.
Here's how I go ahead:
- I write the book in Pages on a Mac. I use page layout when the goal is paper or pdf. Page size 20 cm width x 15 cm height, since that's one of the formats that iPhoto book has. The picture above shows that the physical book I got back was 19.5 x 15.2 cm.
- I export to pdf, best quality. I get one pdf.
- I open this pdf in GraphicConverter as 400 dpi and export from GC. It will make jpg of all my pages in one batch. (In 2008 I could export directly from Pages to iPhoto, but it only yielded 200 dpi, which was not good enough for the 10 point text. Also, Preview for Lion does export to jpg any dpi you like, but only one page at a time).
- I import all my jpg images of my book pages to iPhoto. It has no idea that this is a book with short stories.
- I build the book and order it. This book uses formal layout and 20x15 cm softcover. But before that I iterate too many times, hence the figure above. The figure really says everything valid for my last order, the way it's described above.
- To iterate I use archive book as pdf from iPhoto (one pdf), and export as jpg (one jpg per page). I study and try and study. Next time I'll reread this blog note!
There are some things I'd like to be a little different (see some book terminology here).
- There is no title on the spine. I assume the books Apple produces often are too thin, so it's difficult to get the title correctly aligned at that cost.
- The rear cover has a defined format, with one or two predefined windows (one for bitmap and one for text, see next figure). The rest of the structure may be defined by a few choices. I assume it's because letting me do the rear cover myself with include knowledge of how thick the back (book) is.
1.1 Filling rear cover window
As mentioned I had to experiment a lot to find a correctly sized graphics file to paste into the rear cover window. Again, formal theme, and a layout with a window for graphics and one for text.
There are some problems. The first problem arises from the fact that Apple does some edge fading of the graphics. Probably nice for a picture, but not for an ISBN-13 barcode. The second problem is the limited handling: I can only scale up (not "smaller" from the original) with a slider, and push the picture left or right. In the picture you see that it's not aligned correctly in the middle yet. The third problem is the missing scale to fit or scale to fill. And the fourth is that I don't know how scaling & fitting is done initially. But I still assume that the tool designers at Apple have had their reasons for these design choices: probably to make standard handling as easy as possible.At first I made the graphics like I thought it should, thin and just enough white space. This did not fit, some part of it was lost. To make a long history short (I tried some 5-10 times), have a look at the graphics (top, right): much more right and left white space than I thought. The pixel width x height is 2669 x 2967 or 0.89. It's completely over-bitmapped, but iPhoto scales it down ok. I don't know if any 1:0.89 picture would do, but I assume so.
I assume that if I had used other layouts than 1 picture, the problems described here would go for scaling into any window on any page, not just the rear cover. But I haven't checked.
Reported to http://www.apple.com/feedback/iphoto.html 4Feb2012.
2. With Apple Pages towards export as ePub
I start with Apple's own descriptive sample file, referenced at http://support.apple.com/kb/ht4168 "Creating ePub files with Pages". Download their "ePub Best Practices" Pages document "Apple ePub Best Practices for Pages.pages".
(Later on you'll see that I'll verify the ePub with the validator provided by the International Digital Publishing Forum http://validator.idpf.org/ to check that I and Apple have done our jobs.)
Then I take my book, previously in a pages page layout document. I export it into a clean text file. Then I copy and paste from it, onto the Apple example document (as they suggest). Going through the clean text is time consuming, but so is figuring out the different styles that the ePub needs to have, but would clash with what I previously had in the original document.
Then I delete all contents and set page size to 20 x 15 cm. What page size means in this context, see next chapter.
Observe that Pages export to ePub will not treat any page break entries! Page breaks are not exported to ePub! Even if they are available in the menu. Pages would not know that you are going to export as ePub later on! This is an impedance mismatch, if you ask me. Pages has two main modes now: 1.) word processor and a 2.) page layout. It knows partly what your'r doing. Not so with ePub! (And the new "iBooks Author" won't solve it, as it does not export ePub, only pdf and ibooks formats. The latter is an extension to ePub.).
Have a look at ePub here: http://en.wikipedia.org/wiki/EPUB. You will see that ePub are text-centric flow based books. And no layout control. Page breaks are layout. There is a good explanation at https://discussions.apple.com/message/17543346#17543346 "Pages to ePub observations and hints" by israfelli.
So, Pages treats everyting that goes into the index as start of page. So, I use "Chapter name" style for this. When pictures are included, they are often glued to the chapter in some way.
2.1 Page and object sizes
Before you add any pictures, make sure to name them with old fashined ASCII only! See chapter 2.3.
Even if the ePub won't have any widt or height, and not even any dpi for pixels, Pages uses it. My book is 20 x 15 cm. So, the front page is inserted as a 600 x 450 jpg. I tell pages that it is "text bound" and that it causes break with zero extra size around. Then I set the size of the jpg to 20 cm, and it ends up as 19.99. Some 4 years ago when I did my first book I remember that this was a hurdle to find out. It may not be so stringent now. The front page is shown by iBooks in the overview section. Still I have also included it at the end of the book, so that people may see it there.
So, width is used to tell relative measures. To me, 20 cm is full width. 10 cm is half. I also think that a picture of full width is a page break, if there is no other reasaon to break the page.
2.2 Shadows
There is no shadows in ePub (is there in 3.0?). In this book the paper version used pictures with shadows. Just copying them across seemed ok, but of course there were no shadows. So, I took the jpg pages sent to iPhoto, cropped them to become wide but not full height and inserted them into the document. Now a pixel is a pixel, shadow or a pimple on the nose.
The first error I did was to insert the picture, then the text, then the picture as every other. Since the pictures were full width, they appeared correctly on a page. But then I increase the text size, so that some chapters were more than one page. My half/half system was broken, and it looked stupid with a picture after the previous, on the right side of the previous double page.
So, pictures were added as part of the text: on top of it. If I set the attributes as with the front page, Pages aligns it on the top for me.
All fine, the shadows went all fine.
But when I in iBooks on iPad selected night theme, all was broken, see right part here (I have obfuscated the text, as it has no relevance here):
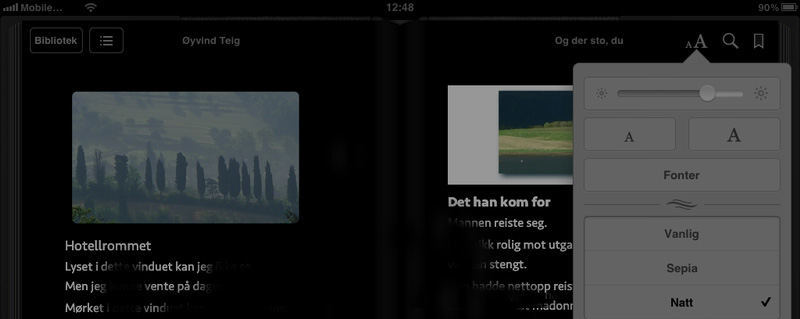
Of course the white background was white. Not very nice.
I had to revert to the old pictures as I had inserted them into the original pages document. I inserted them into a beatuful tool called Picturesque by a company called Acqualia, see http://www.acqualia.com/picturesque/. I have used it for years on Tiger, and now I have it for Lion. It exports with transparent background if you want it. Into png (jpg has no transparency). It also knows when shadowing is over, with no more pixels changed. Photshop Elements is not so nice. It's not nice when a soft shadow gets an abrupt stop. So Picturesque expands your picture as much as needed.
Then I used Graphic Converter to expand with 20% on each side. (I have mailed Acquila about this, if Picturesque could possibly save "with margins added". And got a positive reply.) GraphicConverter expanded transparent with transparent. Good. I want the picture not to fill the whole page (even if the file would). Then I rescaled to 600 pixel width and inserted into pages. You see the result in the figure above (left side).
That being said, shadows are problematic when there is no semantic knowledge. Picturesque would calculate the colours according to the background colour. It's more or less nice when background changes (as it will dramatically, with iBooks night mode). So, ePub should have had shadows etc.
2.3 File names of pictures and a Pages ('09 4.1) error
Before you add any pictures, make sure to name them with old fashined ASCII only!
The ePub file is a package of xml files and graphic files etc. When you drag a picture into Pages, it's just moved into the ePub package, with name and all.
I believe that the error with Pages that I discovered, comes from Pages trying not to insert a graphics file more than once (a hypothesis). So, it has to keep an internal list of included files. Most of my pictures were taken from my picture library, with files with names and places etc. (I don't use iPhoto for this). In Norwegian, where we have the three letters Æ Ø and Å (æøå). When I verified the final ePub (mentioned earlier), the verifier issued warnings with these file names. I hate warning, I always want clean results. Back to the drawing board.
So I inserted the pictures again, after renaming them. To my surprise I saw that Pages kept the old names. The file list must have also stored size and date, or at least some way where Pages would infer that what I inserted was the same file! So, if "same" file, no reason to change its name!
Then I tried to remove all the pictures, save pages and edit it again. Still the old names were kept! With æ ø and å. Impressing. I found no way at all to circumvent this!
I had no other solution than to start from scratch!
However, my backup with the jpg-files was good to have. I used it, and all fine. It did not believe that the jpg and png files were the same.
- Reported to http://www.apple.com/feedback/pages.html on 22Feb2012
- I also informed about this blog note at https://discussions.apple.com/thread/3755214.
After these reports I discovered another peculiarity: Pages may well keep the same name on two different files. This is possible by importing 12.jpg and then renaming the numbered list of file names on the outside so that previous 13.jpg now becomes 12.jpg. So, the next picture to import is 12.jpg, but a different picture than the previous 12.jpg. Either OS X handles this for it, or it has a file-indirection itself. Any way, renaming on the fly (in the Inspector window) should have been possible?
2.4 Alignment of chapter name below a picture
Chapter heading is, as mentioned, of style "Chapter name" in Pages.
I start every new chapter with a picture, as you may see in the picture above. Below the picture is the chapter name. Below or below?
I had given up getting this to show up correctly in anything else than iBooks in iOS. Stanza deliberately seemed to start the chapter heading immediately to the right of the picture, if it decided that it was space for it. To make a long story short:
Make the chapter name start with a soft enter (Ctrl Enter) and then write the chapter name.
Of course, this pushes the cursor to the left. The index works fine, it does not see any extra empty line. There is no extra page (as hard enter causes). In both iBooks and Stanza! And Adobe Digital Editions on the Mac (Lion)!
Ok, it appears below the picture. But it's left aligned in iBooks (iOS) and Adobe Digital Editions (Mac), and centered in Stanza (iOS). But it looks ten times better!
My ePub
You may download the one I have described here from this page (search for "ePub"): http://www.teigfam.net/oyvind/ogderstodu/. It's free from that page.
.


No comments:
Post a Comment